Tube/Image of Choice - I'm using my ol' favourite - Tabitha by Keith Garvey. It's just superb and you can purchase it from MPT
Scrapkit - again, I'm using Ghost Town by my pal Clarey HERE
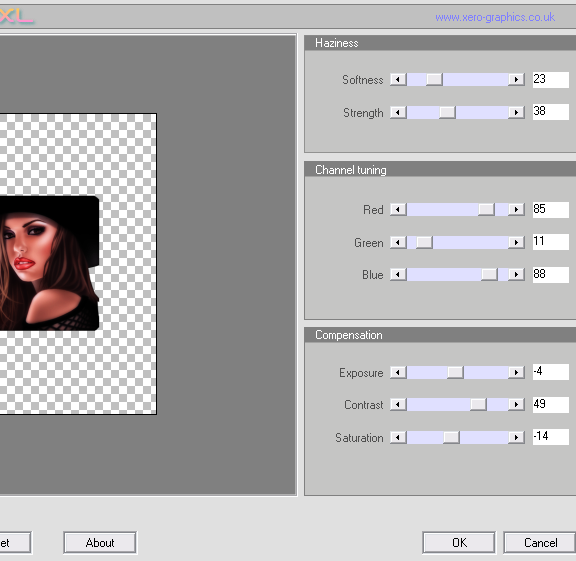
Xero Graphics Soft Mood XL - yup, the XL version - if you haven't
already got it - grab it HERE
Mura Meister Copies - use your search engine to find and download
Xenofex 2 Constellation (optional)
Masks - Chelle Weescotslass WSL_Mask220 and my mask Vix_Mask286
______________________________
Open a New Image in PSP - 650 wide by 600 high
Add New Layer
Floodfill White
Open acrylic frame
Resize 80% SS
C&P
Place on the tag canvas
S'nice innit? But we're going to recolour this in a min :D
Open curledribbon2
Resize 50% SS
C&P
Then
Image, Free Rotate, Right 90
and
Mura Meister Copies - on the Encircle preset - default settings
Apply
Move this layer below the acrylicframe layer
Open Paper14 (pumpkins one)
Resize 86% SS
C&P
Place under the ribbon frame we just made
then
Click inside the Ribbonframe layer centrally with Magic Wand
and Selections, Modify, Expand by 2
Invert
and hit Delete on the paper layer
Selections None
Make sure your paper is below the ribbonframe layer
Now, on the acrylicframe layer
Adjust, Hue and Saturation, Colourize
and choose
Hue 24 and Saturation 192
Click OK to apply
then
Open Paper2 (the black one)
Resize as before
C&P
Place under the acrylicframe in the LP
but above the rest
and repeat the Selection Expand Delete
BUT this time Expand by 4
then
Invert, and Delete the Excess black paper
Selections None
Open Paper10 (spotty)
Resize as before
C&P
Place just above the White Background in the LP
and
Crop Tool - Snap Crop Rectangle to: Merge Opaque
and it will get rid of the slight bit of paper overhanging the tag canvas
Then
Apply Chelle's WSL_Mask220 (one of my all-time faves!)
and
Layers, Merge, Merge Group
Open Paper 2 again (the black one)
Repeat the resize, C&P and Crop
then
Apply to this black paper - my mask Vix_Mask286
Layers, Merge, Merge Group
And make sure this mask layer is above the spotty one in the LP
OK
Onwards!!
Open your chosen tube
(I know I use Tabitha every Hallowe'en season - but she is such a rockin' tube!!!)
C&P
Place as liked - either left or right of the tag canvas as mine
Open the Close Up/Image tube if you're using one
C&P
And place on the opposite side to your tube
So, mines on the right
Do a Selection Delete to get rid of the excess tube and
make sure this layer is below the acrylic frame but above the black paper fill
Open GlitterSplat 2
Resize 60% SS
C&P
Place over on the right of the tag canvas (see mine for ref)
and move down
so it's just above the mask layers in the LP
(Do this on the opposite side if you placed main tube right etc)
Duplicate
Image
Mirror
Image
Flip
Open spidersweb2
C&P
Place as mine - line it up under the acrylicframe layer
but above your tube image
and place so it's "sticking" to the sides of the frame
On this web layer
Adjust, Add/Remove Noise, Add Noise, 30 Uniform with Monochrome Ticked
and apply a Drop Shadow to the web of
2
Minus 9
18
8.00
Black
Now click inside the acrylicframe with Magic Wand and do a
Selection Delete for the excess web
Duplicate your Image layer that's within the frame
And on the top copy
Adjust, Blur, Gaussian Blur 3.00
then
Go to the bottom image and apply Xero Soft Mood XL on these settings
of mine...
Then
On the Top copy of the Image
Change the Blend Mode to Screen and drop the Opacity to 67
Back to the bottom tube image and apply the same dropshadow we used for the web
(Note: if needed, do a Selection Delete to remove any blurred tube image that may poke out under the frame edge
but there wasn't any when I made mine, so it'll depend on tube placement and amount of expansion you use)
Hide your main tube for now
Open hauntedhouse2
Resize 60% SS
C&P
Place under the acrylicframe layer, and the two image layers but above the black fill in the LP
and position as mine within the frame
Apply the same Soft Mood settings
then
Do a Selection Delete to get rid of the excess house
Unhide your Main tube layer
and check you're still happy with placement
if not, move it about :D
Open stripedswirly3
Image, Resize 30% SS
C&P
Layers, Arrange, Bring to the Top so you can see what you're doing
then
Image, Free Rotate, Right 90
and
Apply Mura Meister Copies
BUT
Change the Shift X and Y sliders to 60
and the Number to 20
Apply
then
Move down the LP so it's just above the masks layers
Apply a subtle dropshadow to the two glitter splat layers
0, 0, 35, 7.00 Black
Same for the swirly circled layer you just made
then
Apply a good tube shadow to the curledribbon frame layer
I used 0, 0, 40, 10.00 Black
Optional: add a Xenofex 2 Constellation
setting to this layer - BUT do it BEFORE you apply shadow
or it'll look odd lol!
Apply same dropshadow to the acrylicframe layer
and to your main tube layer
Now
Add your name in a style and font of choice
THEN if you're adding the spider - see * below
Apply the same shadow as for the web
Add Artist info
Crop the Canvas
Delete the White Background
and save as PNG
Hope you enjoyed this tut :) xx
*NOTE: For added spookiness, I took the Spider from the SpookyTree in Clarey's kit
and added it to the finished tag above (Simples, just open the Tree - take Selection Tool
Draw out a Rectangle around the spider and some of his trail - then Cut, Selections None, close
the tree and DON'T save changes then Paste your cut selection
onto your current tag canvas and place where liked and shadow as for the web erasing any excess
trail if needed) but this is optional as I know a few taggers who
don't like the eight legged beasties lol!!
This tutorial was written 5th October 2010