
Tube of Choice - I'm using a gorgeous one by Ted Hammond
Artwork © Ted Hammond
If you wish to use the same tube you must purchase it from CILM
However feel free to use whatever you have in your collection
Scrapkit - PTU - I'm using the superb "Sin City" by Jessica over @ Gothic Inspirations - thank you sweetie xx
Please go HERE for more details
Background Image of choice - preferably a Las Vegas shot - I used one
from Stock Xchng www.sxc.hu - I used Las Vegas as the search word
and found one I liked by getjustin on (I think) about Page 6 or so.
Two masks by Chelle WeeScotsLass - Mask 145 and 220
Xero Graphics - Pastellise
Xenofex 1 - Shower Door
(both of these filter plug ins are freely available from the Net)
Lokas Shadow (optional)
Sparkles of Choice also optional
Font of Choice - I used a FontDiner.com font called Loungy
________________________________
OK - so
The Usual, a new Canvas in PSP
I used 680 x 600 (nice and big but if you'd like to start smaller
or you have forum restrictions where you post, then just adjust as needed and
do the same for the following element percentages too)
Then
C&P your chosen tube as a New Layer
Place centrally to the tag canvas, resize if needed
then hide the tube layer for now
Open Paper5
Leave for the moment
Now, open the Nightlife photo/image you've chosen to use - a landscape image
works better than a portait one
IF you've used the same one as me, resize image 30%
then
C&P as a new layer on our tag canvas(ideally you
want the image size to be not as massive as the canvas, but
large enough to take the mask) just above the White Background
Now unhide your tube so we can build the tag around it
Now
On the Background image,
Use Chelle's mask WSL_Mask145
Layers, Merge, Merge Group
Make sure it's below your tube layer
then
duplicate the mask layer
and on the bottom copy,
Adjust, Blur, Gaussian Blur by 10
then
go to Xenofex 1 - Look for Shower Door
and apply the Collage preset from the drop down menu
Now duplicate the untouched mask layer again
and on the top copy
Apply Xero Graphics Pastellise - on these settings of mine
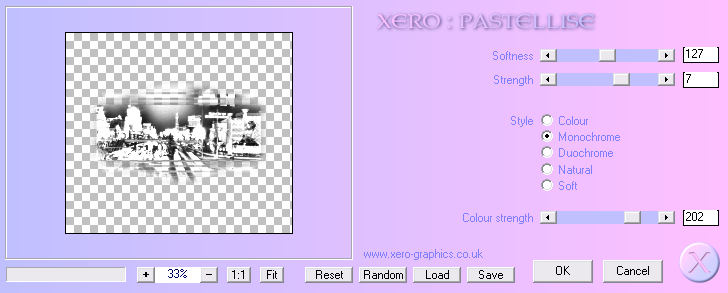
Hope you get the same effect as me - you shouldn't have any extra background
added to the layer - if it's applied right, the preview window hopefully will show
as mine
Anyway, once applied
Change the Blend Mode of this mask layer in the LP to either Soft Light or Overlay -
whichever you prefer
So you should have 3 masked layers
the Top one in the LP should be the Pastellised one
the middle should be the untouched mask one
and the bottom should be the Shower Doored one
Yes?
Cool!
OK
Duplicate your tube layer
and
On the top one - apply Pastellise as we did for the mask layer
Same settings
but this time
Change the Blend Mode in the LP to Burn or similar, we want a nice darkened effect
OK?
Cool
Now, let's element this baby up lol!
Open Vegas Sign
Image Resize 50%
C&P
Place as mine
Open Dice 2
50%
C&P
Place to the right of your tube
Duplicate
Image
Mirror
Open Scatter Bling
70%
C&P
Place to the left of the tag as mine
Move this down the LP below all the mask layers
then
Duplicate
Image
Mirror
Open Poker Chips
30%
C&P
Place to the left
Duplicate
Image
Mirror
Open Money
50%
C&P
Place to the right of the tag as mine
just under the right dice layer
Then
Open Money Bag
40%
C&P
Place above your tube layer
and duplicate
Use to cover any half body or leg chop off from your tube
or (in my case) the furry carpet (yikes! lol!)
Anyway, use it as mine, but don't mirror image the bag
Just duplicate and move over as needed
Now - remember our paper from way back? lol!
Go to Pattern (in the Materials Palette, next one along from Colour/Gradient)
Find the Money Paper - but change
the Scale to 40
See my settings here
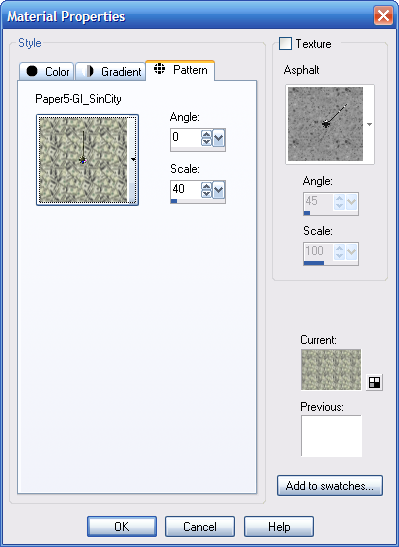
Click OK
and you should now have the Pattern in your Foreground (or Background) box
Good
So add a New layer just above the White Background
and Floodfill this new layer with your Money pattern :D
OK
Now you can close the Paper - we're done with that
And
On this money layer
Apply Chelle's Mask - WSL_Mask220
Layers, Merge, Merge Group
and
Duplicate this layer for added emphasis
Now then - dropshadows!
One of the best finishing touches for any tag imho :D
So...
Don't shadow any of the mask layers
but for all the elements use
2, 2, 45.00, 5.00 Black
Apply to all elements
and
On your bottom copy of your tube - not the Pastellised one
Apply
a favourite dropshadow that you'd usually use for tubes
I used one from Lokas Shadow called Flat Faint Shadow (it's a preset in there)
Now, crop the canvas again to the size you'd like it (it
also helps to get rid of any overhangs, if there are any)
I just cropped to the size it is - 680 x 600
Add your Artist info now and if using photo/image
that needs a courtesy mention, add that too.
And if liked, add some sparklies you may have
I added a New layer
and looked in my Picture Tube tool and found Sparkle (dunno if
it's a preset or one that I obtained but I used that)
and placed various sizes of it to compliment the Sparkle Bling layers
I also used some other sparkles I had :D Improvise with what you have
and see what you like
then
finally -
Using one of the fabulous Font Diner retro Vegas style fonts
(I used Loungy)
I added the name in a glitter fill and black stroke
Place in the blank space top right
and added the element dropshadow
All done :D
Hope you enjoy xx
_______________________
This tutorial was written on 25th February 2010 by VixIt is a tutorial based on a tag of my own design created
this morning and
any potential similarities to other tag tutorials that
may be available is wholly unintended and completely coincidental.
Links to tube/scrap blogs or sites are added either through necessity or creator courtesy,
and it is entirely up to the individual (ie. You!) if you choose to visit these sites and/or download/purchase from them.
Scraps used in my tutorials that I've obtained from PTU purchased scrap kits are NOT supplied in my tutorials supplies.
NO linking to my tut examples, screen shots, files or graphics permitted
All of my tutorials are registered with TWI